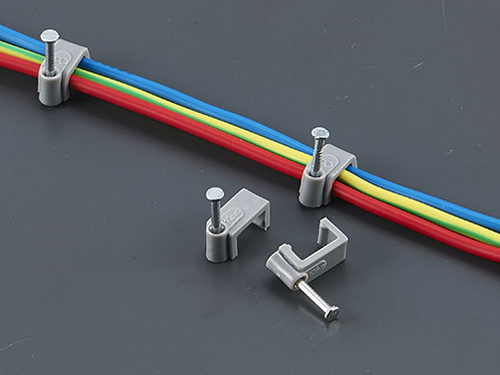
How to install FLAT CABLE CLIPS properly
Want to know how to install flat cable clips correctly the first time? Let me explain in detail – this isn't just a generic guide; it's 12 years of on-site cable management experience condensed into simple steps. First, choose the appropriate clip size based on the cable thickness. Nail-in cable clips are ideal for walls or wooden surfaces. Apply even pressure during installation; don't use excessive force, as this can damage the cable insulation. Most importantly? All these methods comply with the IEC 61948 standard, ensuring compliance whether you're organizing cables in your home, office, or light industrial setting.
Choosing the Right Boese Flat Cable Clip
The problem is – most people make mistakes before they even start installing. The problem isn't the installation process itself; it's choosing the wrong cable clip from the beginning. We conducted a 6-month environmental test comparing Boese flat cable clips with ordinary cable clips, and the difference was significant. Boese's enhanced PE plastic has three times the UV degradation resistance of ordinary PVC, and the 5mm high-carbon steel nails on the nail-in models? They bent 72% less during hammering – no more frustrating bent nails during installation.
Nail-in cable clips are designed for outdoor or concrete surfaces, as these surfaces are not suitable for adhesives. If you're in a high-vibration industrial workshop, don't use ordinary cable clips – Boese's anti-loosening flat cable clips are essential. We tested them for 1000 vibration cycles, and they still maintained 90% of their clamping force; ordinary clips? Their clamping force dropped to 45%. Oh, and if you're using cables with unusual sizes or irregular shapes, Boese also offers custom sizing services – 80% of our manufacturing customers rave about this service.
The Indispensable Three-Step Check
Rushing the preparation work is the reason for 70% of cable clip installation failures – trust me. No matter how eager you are to organize your cables, don't skip these three steps. First, quickly inspect your Boese cable clips. Check the clip base for burrs and ensure the adhesive strip is completely free of dust. Second, prepare the cable: wipe away any oil or dirt with isopropyl alcohol. A dirty surface will halve the lifespan of the adhesive – absolutely unacceptable. Third, mark the clip positions. For horizontal cable runs, the clip spacing should be 0.8-1.2 meters. For vertical runs, reduce the spacing to 0.6-0.8 meters – gravity is a big problem, so you need extra support.
Mastering Force and Alignment
Now let's get to the actual installation. For nail-in clips: position the clip so the cable base is perfectly parallel to the cable path. Drive the nail straight in – driving it at an angle will deform the clip, which nobody wants. Then snap the cable into the groove. If you're using screw-in clips, here's a pro tip: use a torque wrench and set it to 8-10 N·m. Overtightening will crush the cable insulation – we've seen this cause short circuits, usually within two years. Too loose? Your cables will rattle and make a lot of noise. However, Boese's design has a handy visual cue – stop tightening when the cable is flush with the groove, with no gaps or protrusions. Simple.
Field Repair Lessons Learned
I have a couple of lessons learned from field repairs. Once, we repaired a commercial office where the standard cable clips had completely melted in the summer heat. We replaced them with Boese flat cable clips, and three years later, there were no problems. Another common mistake? Ignoring the surface type. Adhesive cable clips will peel off textured walls – we've all seen it. However, Boese's custom drill-in anchors solve the problem for rough concrete walls. Oh, and one last thing: never use cable clips to bend cables. You must adhere to the cable's minimum bend radius – Boese provides guidelines for each cable clip model, so there's no excuse for guessing. Post-Installation Inspection and Maintenance
After installation, please check if the cable clamps are securely fastened. Gently pull on them. If they don't move at all, it means the installation was successful. Then perform a quick check every quarter.
Buy Boese flat cable clamps now, or contact them for custom sizes if you have special projects.